
Microsoft Dynamics 365 Payroll Tips & Tricks for Benefits – Creating Benefits:
Welcome to Part 3 of our Tips & Tricks Blog Series for Microsoft Dynamics 365 Finance:
Part 1 – Finance Tips & Tricks for General Ledger
Part 2 – Tips & Tricks for Fixed Assets – Asset Location & Lending
Part 4 – Payroll Tips & Tricks for Benefits – Maintaining Benefits
Benefit Elements:
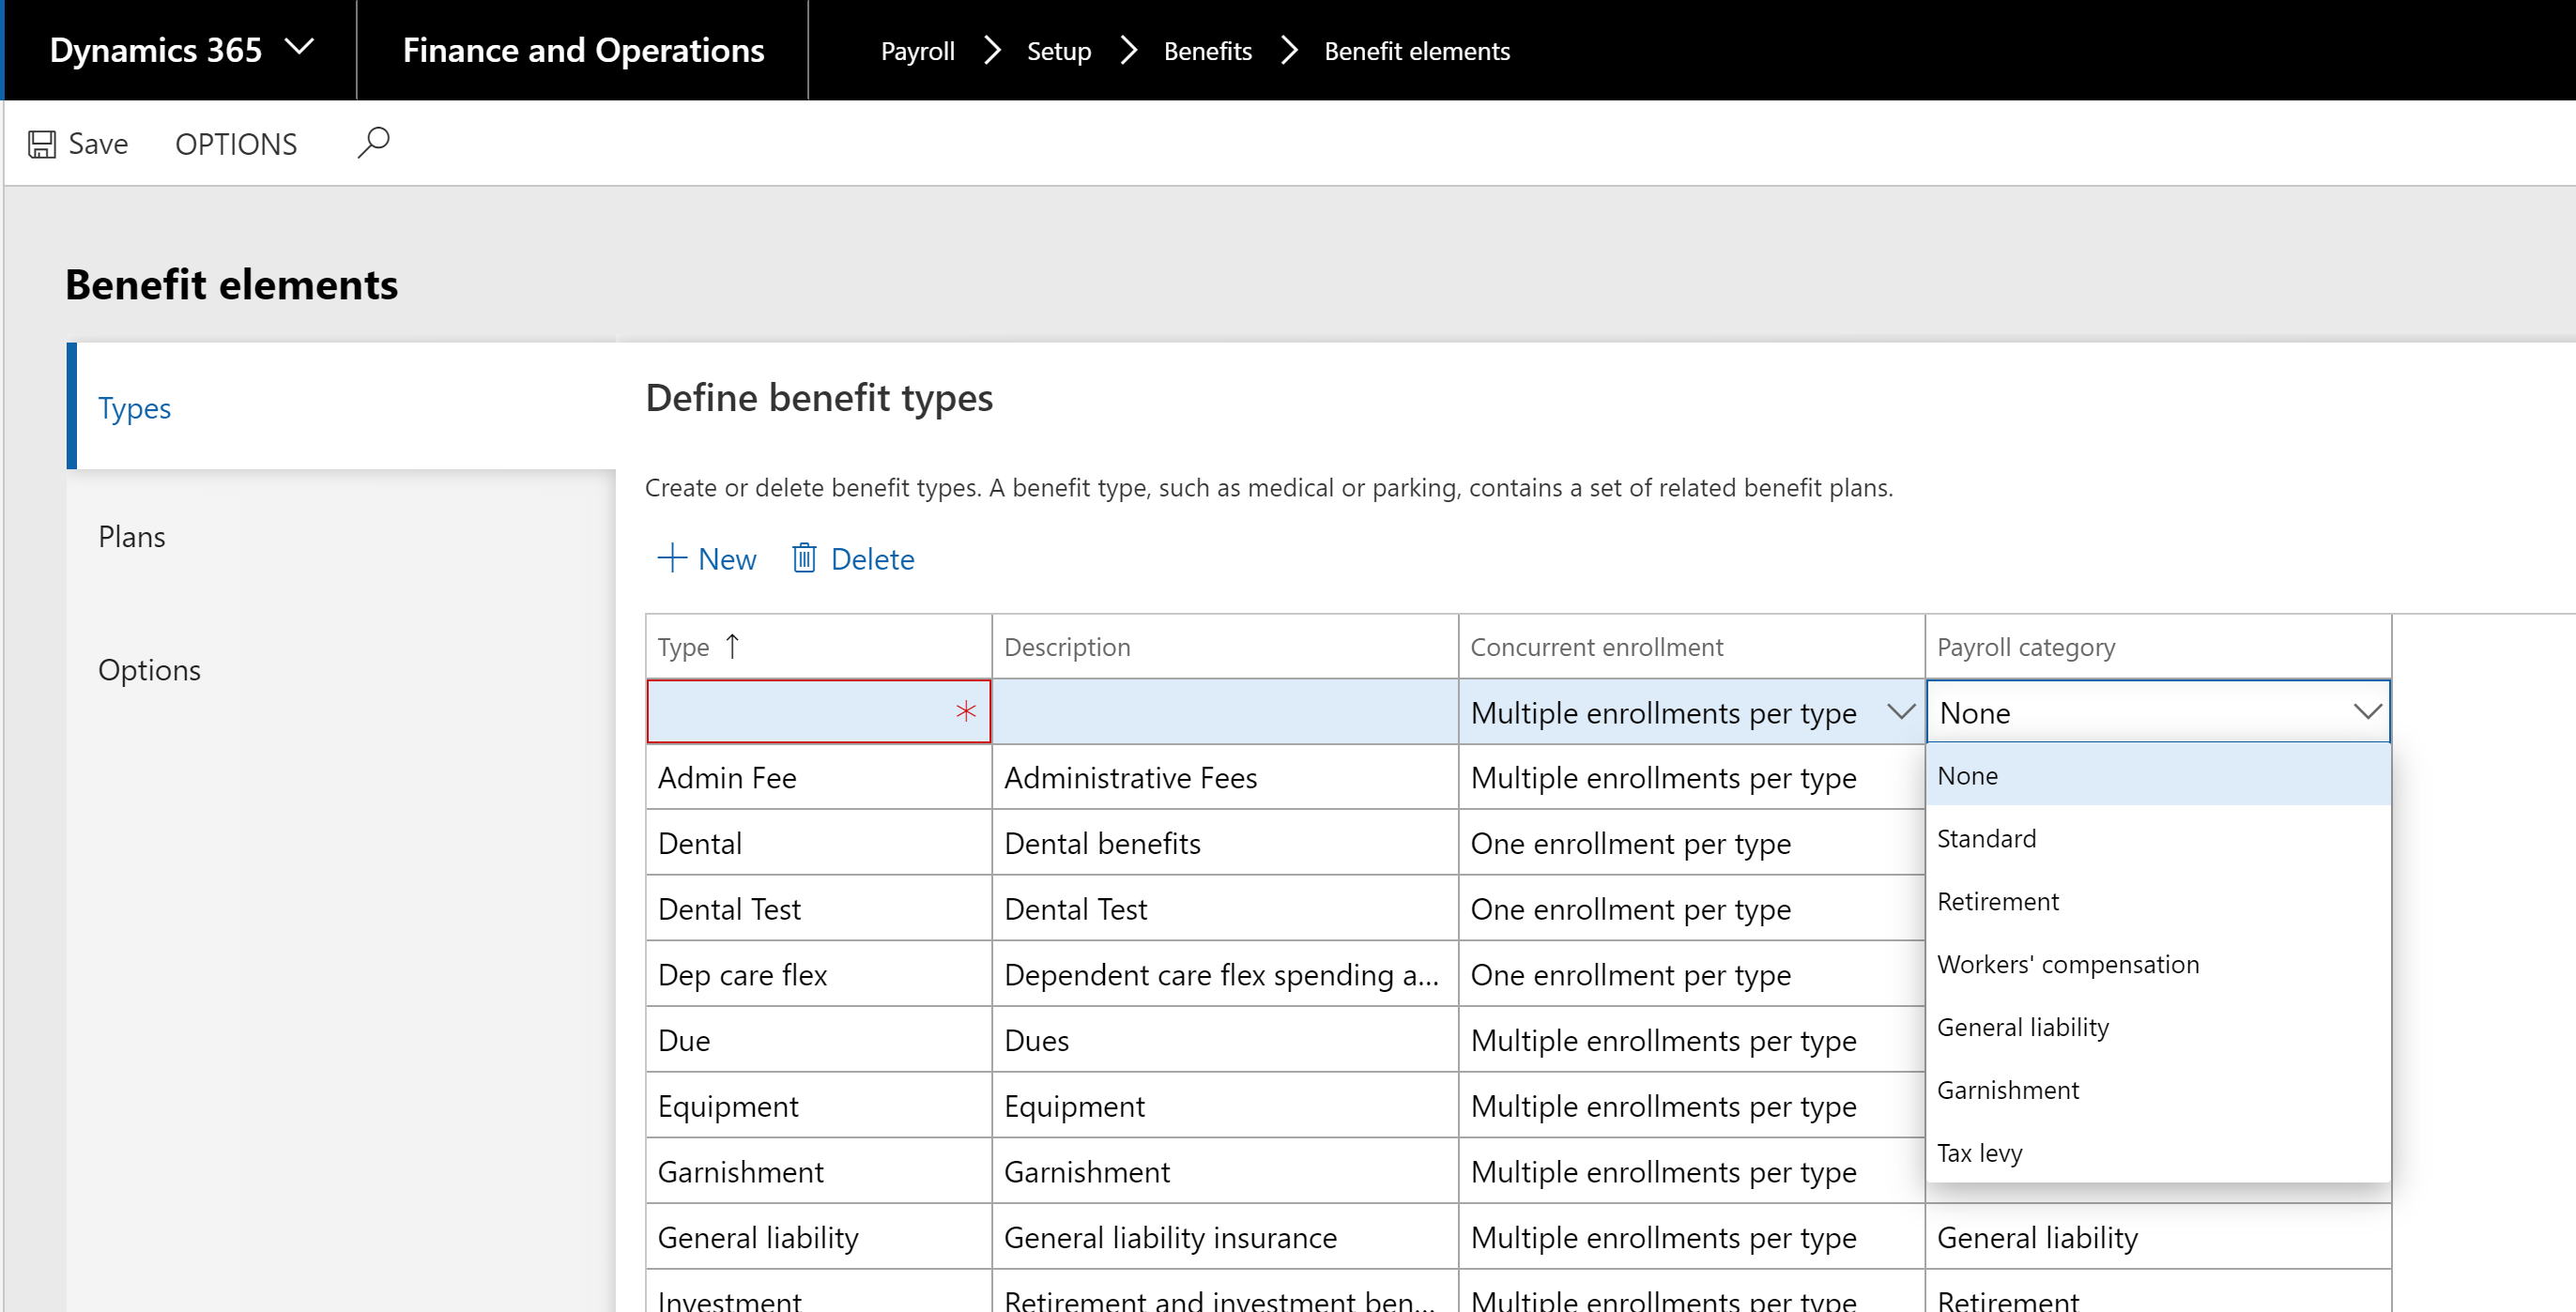
There are a few steps in creating a benefit for payroll. The first steps include building the 3 benefit elements in Payroll > Setup > Benefits > Benefit Elements
Types: The benefit types are a way to group benefits together and assign the benefit category. The category determines the information that will be available to select when building the plan. This is the first step to building the benefit list.
Plans: The benefit plans are where the payroll impact is determined, the ledger accounts are assigned, setup the tax rules, and other structures are set.
First step is to name the plan and assign it the type. Then is it a deduction the employee pays, a contribution provided by the company, or both? Does this benefit get reported under the Affordable Care Act? Next, the tax rules can be setup based on section 125, retirement plan types, FSA, or custom based on your requirements. It is recommended you discuss with your tax accountants the correct way to set up this section.

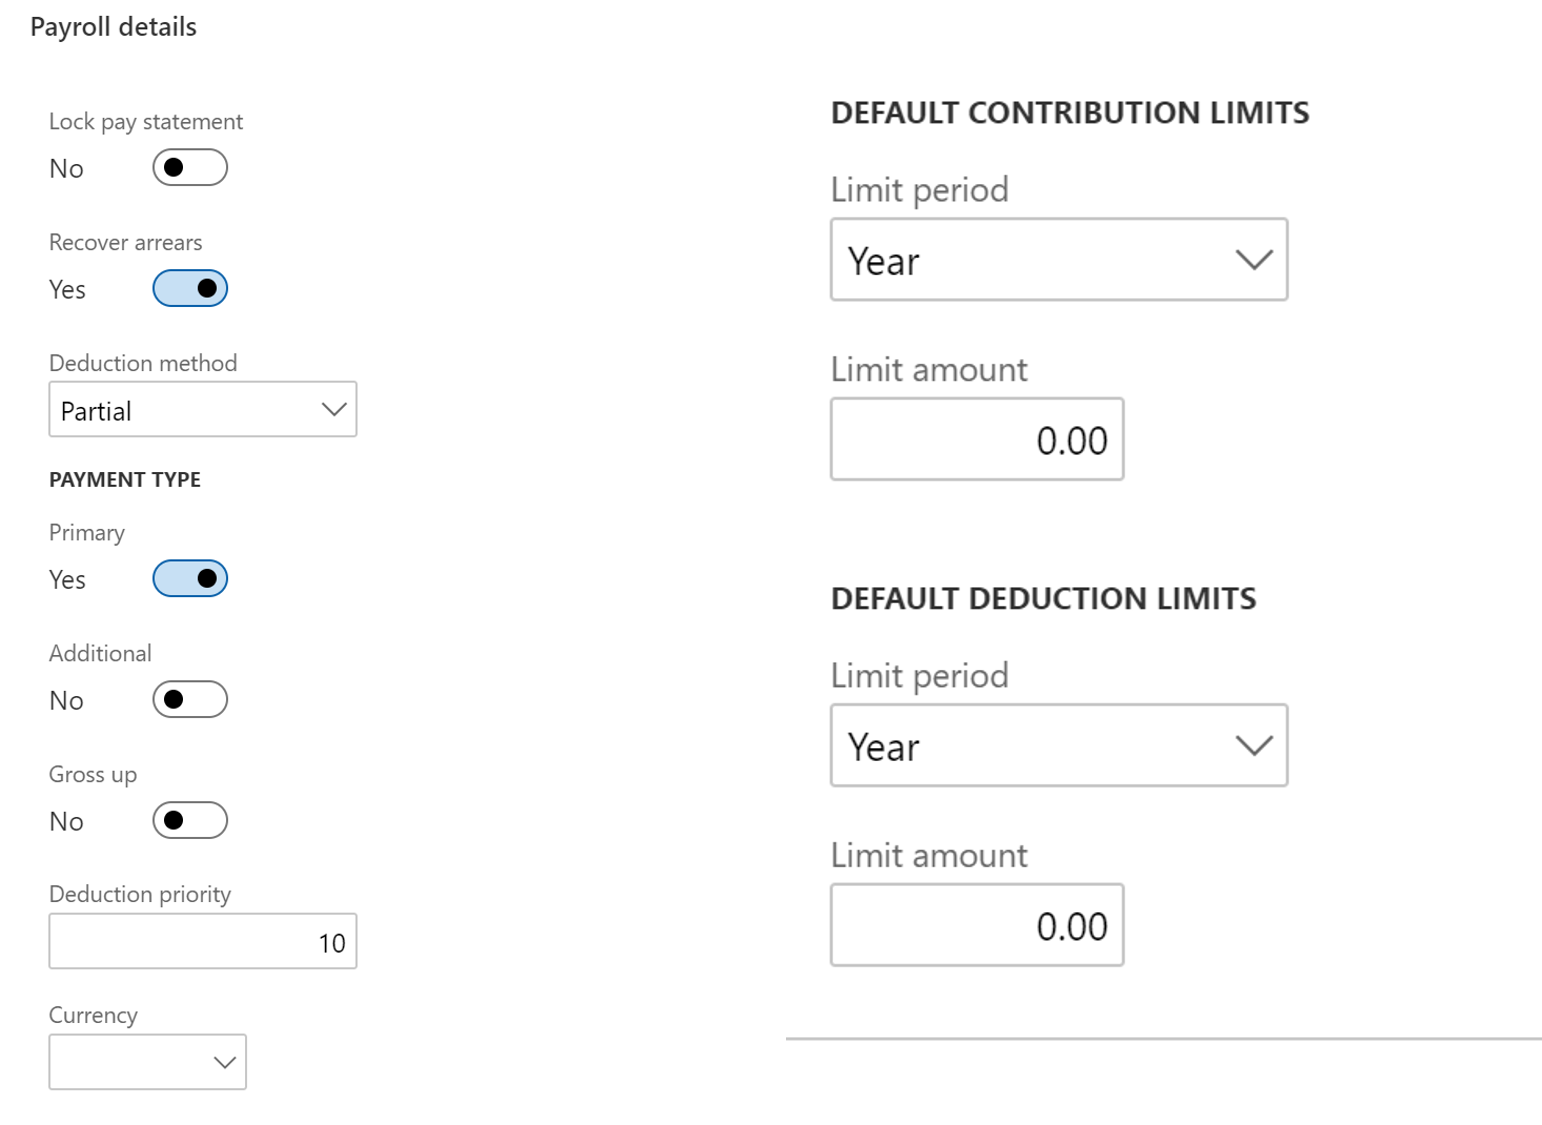
The third section of the plan determines how the benefits will be paid. This includes items such as locking the benefit in payroll so it cannot be adjusted in the pay statements. If earnings will not cover the full amount of the benefit, do you remove partial and then recover the rest in arrears? Which types of payments will the benefit effect and what is its deduction priority compared to other benefits? Is there a maximum limit for deductions or company contributions?
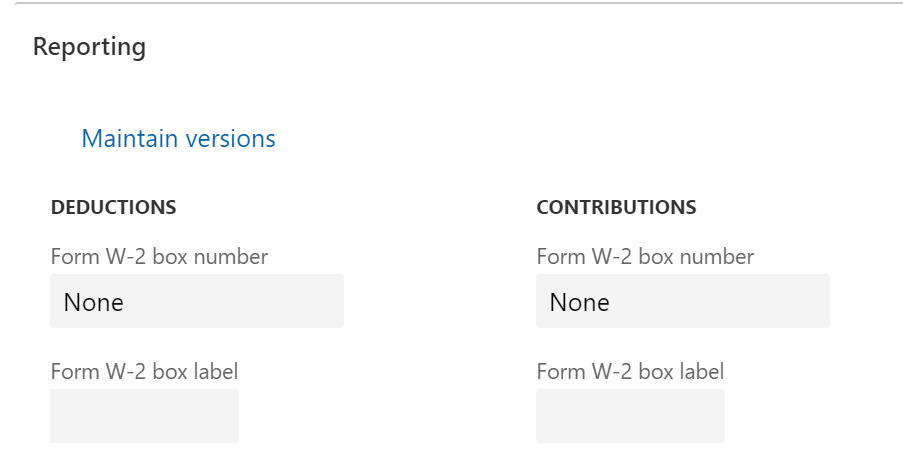
After you have setup the taxes and payout options, you can setup the reporting feature related to the W2 tax reports. Assigning the box number and label.
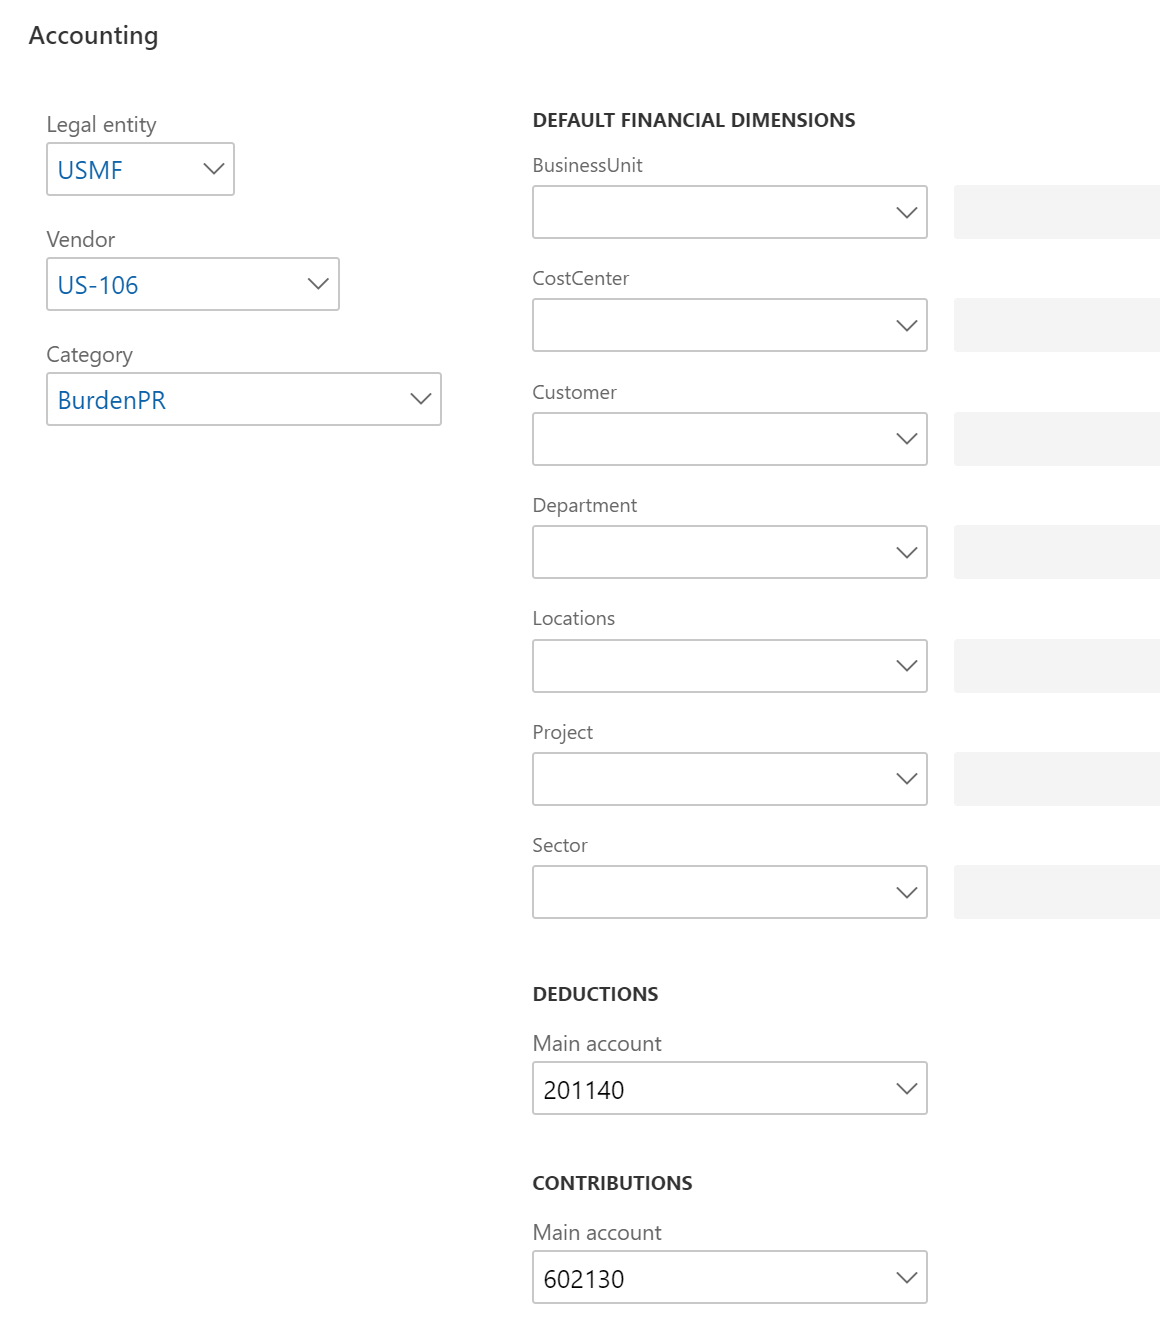
The final section takes care of the accounting to the main accounts, dimensions, and vendor options. The vendor portion if for those benefits that you will create an accounts payable invoice based on what is produced in the pay statement. A future article will cover this feature.
The category is linked to your project categories and is an optional field. Another optional section is the default financial dimensions, like other modules this allows you to input the dimensions if they are fixed for all postings. You can update as many as desired or leave this area blank and the dimensions will pull in based on employee information. Finally, the main accounts section which is required tells the benefit where to post to the general ledger. This is only the partial setup for the ledger, you will also need to setup posting definitions which we will cover at the end of this article with more details on the suggested ledger accounts.
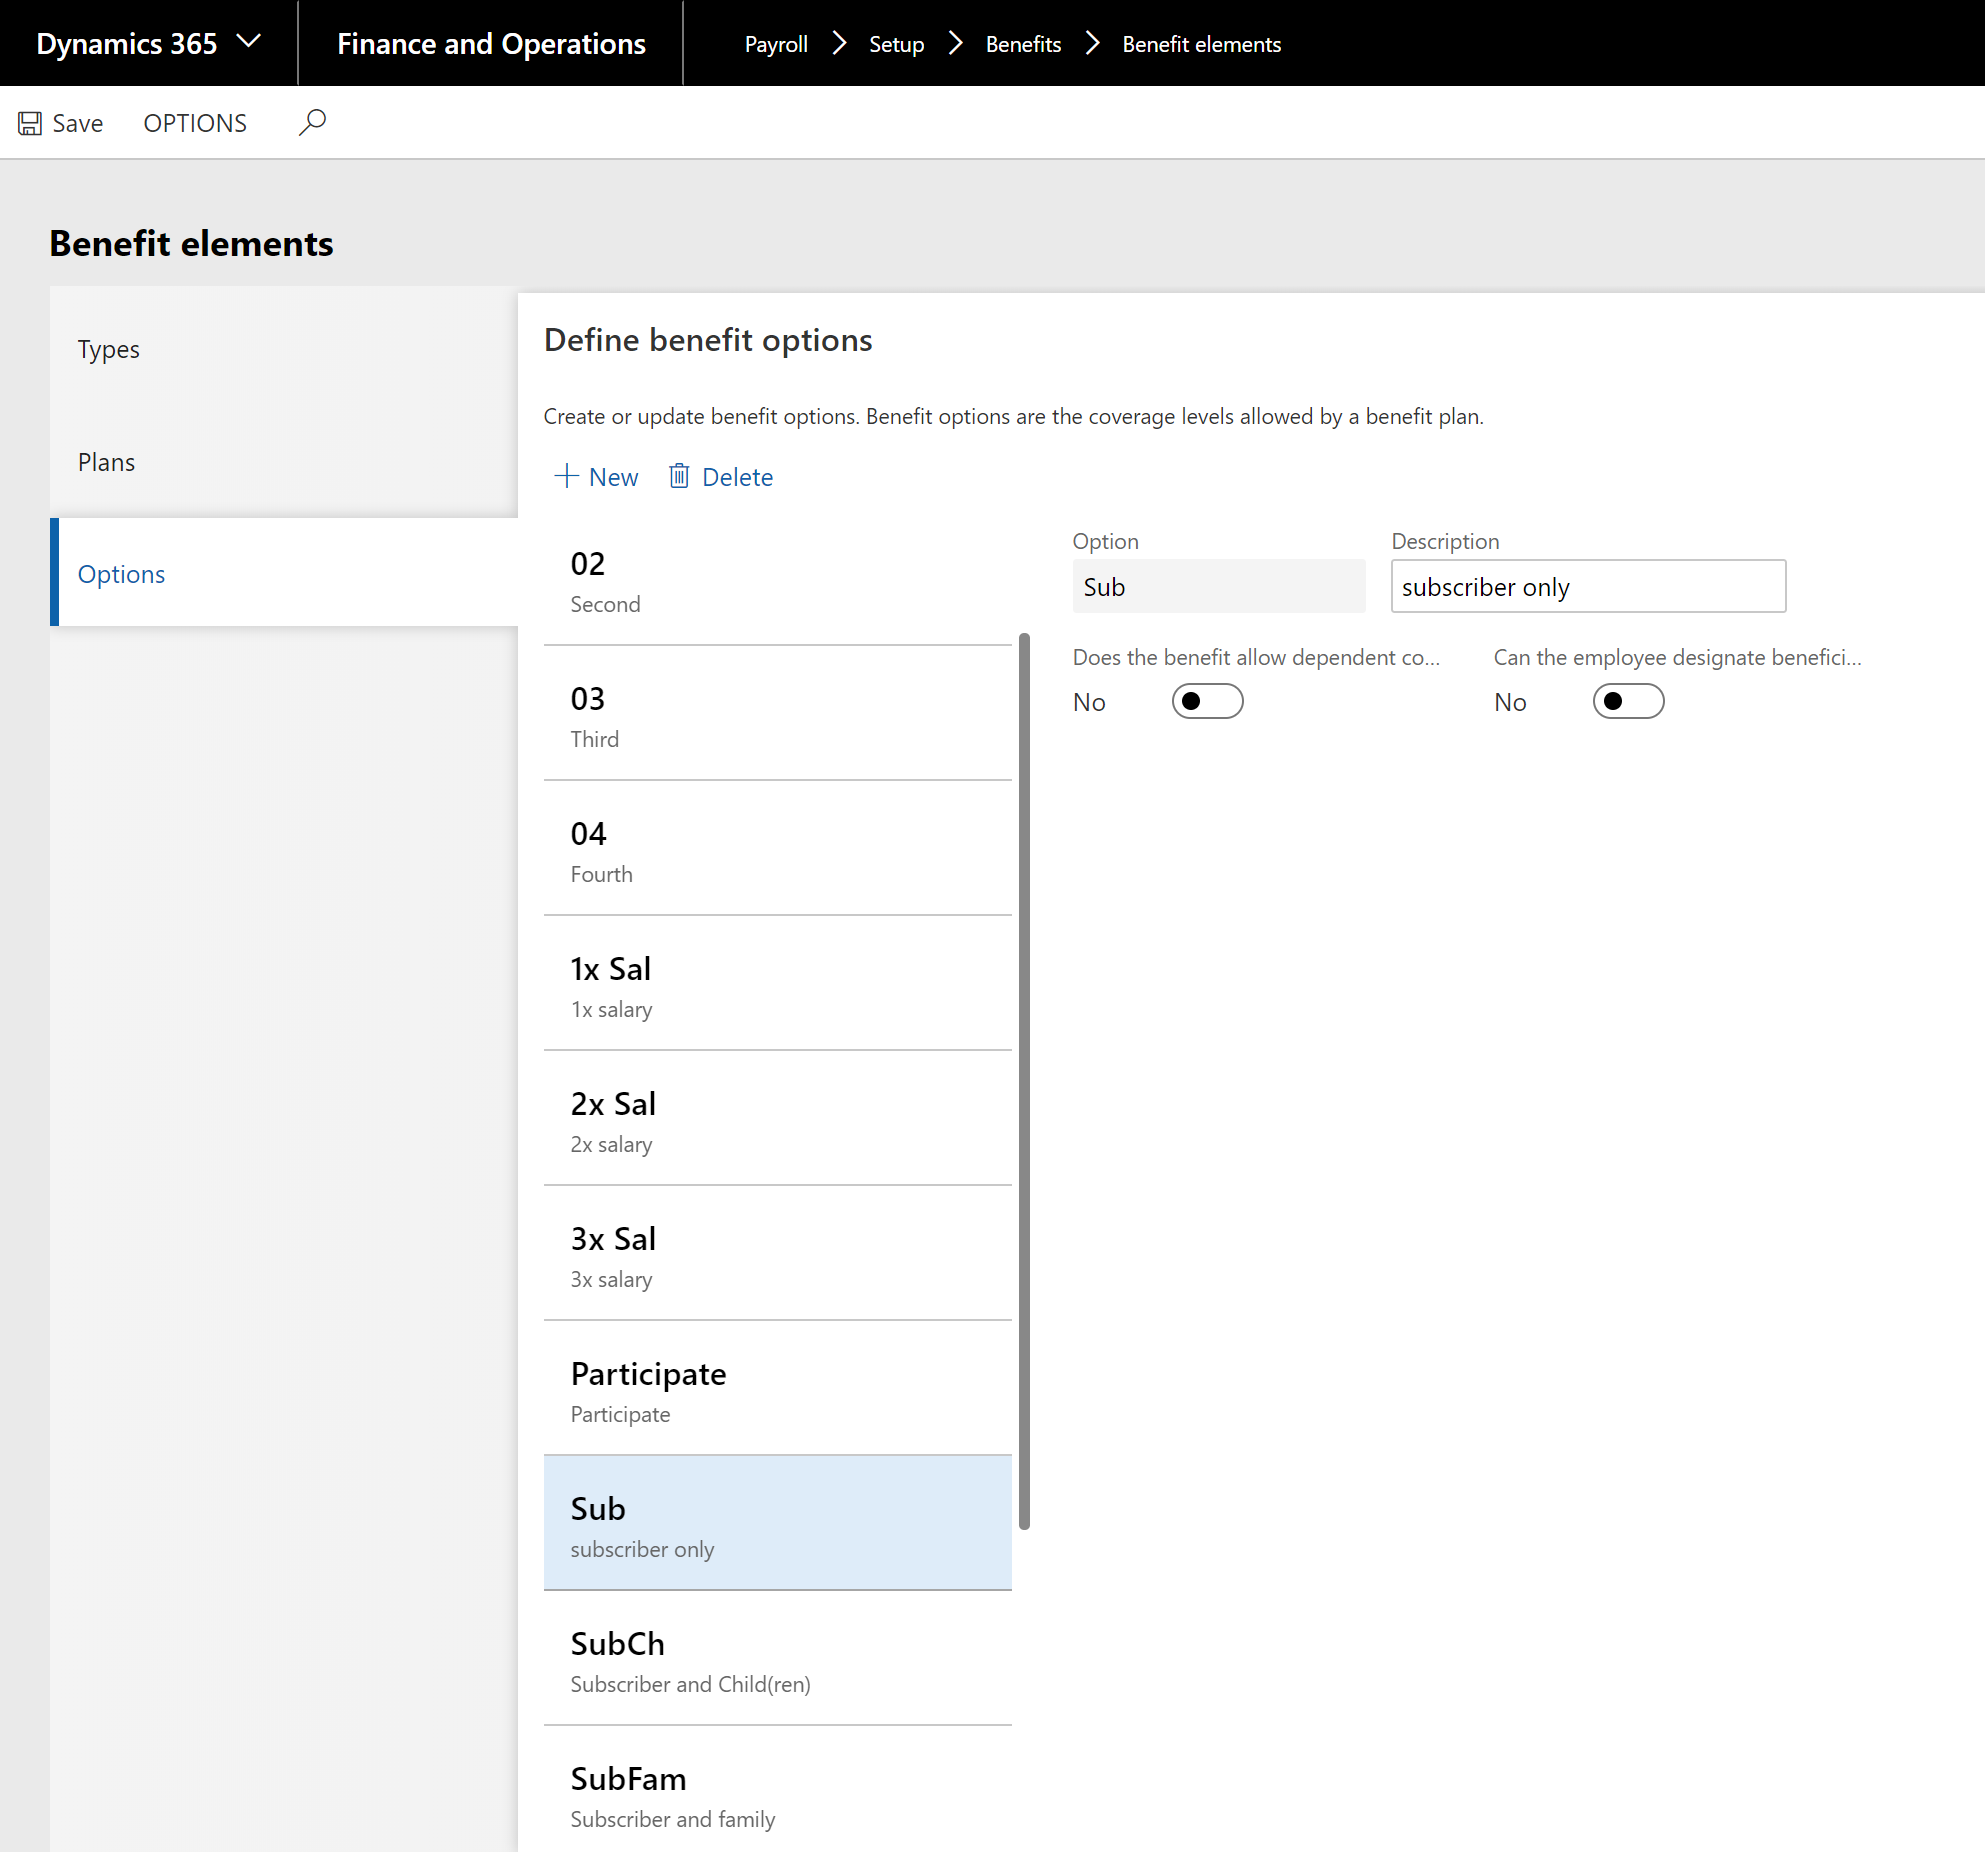
Options: Options allow you to have multiple versions of a benefit plan. An example is healthcare that offers options for employee only, employee + child, employee + spouse or employee + family. Instead of creating multiple plans, you can have one plan with multiple options. It is also recommended that you create some that are numbered 1-4 for garnishments such as child support when an employee has more than one child to pay support. You must have at least one option to create benefits.
Benefits:
Once you have created the benefit elements you can move to building the benefits in Payroll > Setup > Benefits > Benefits
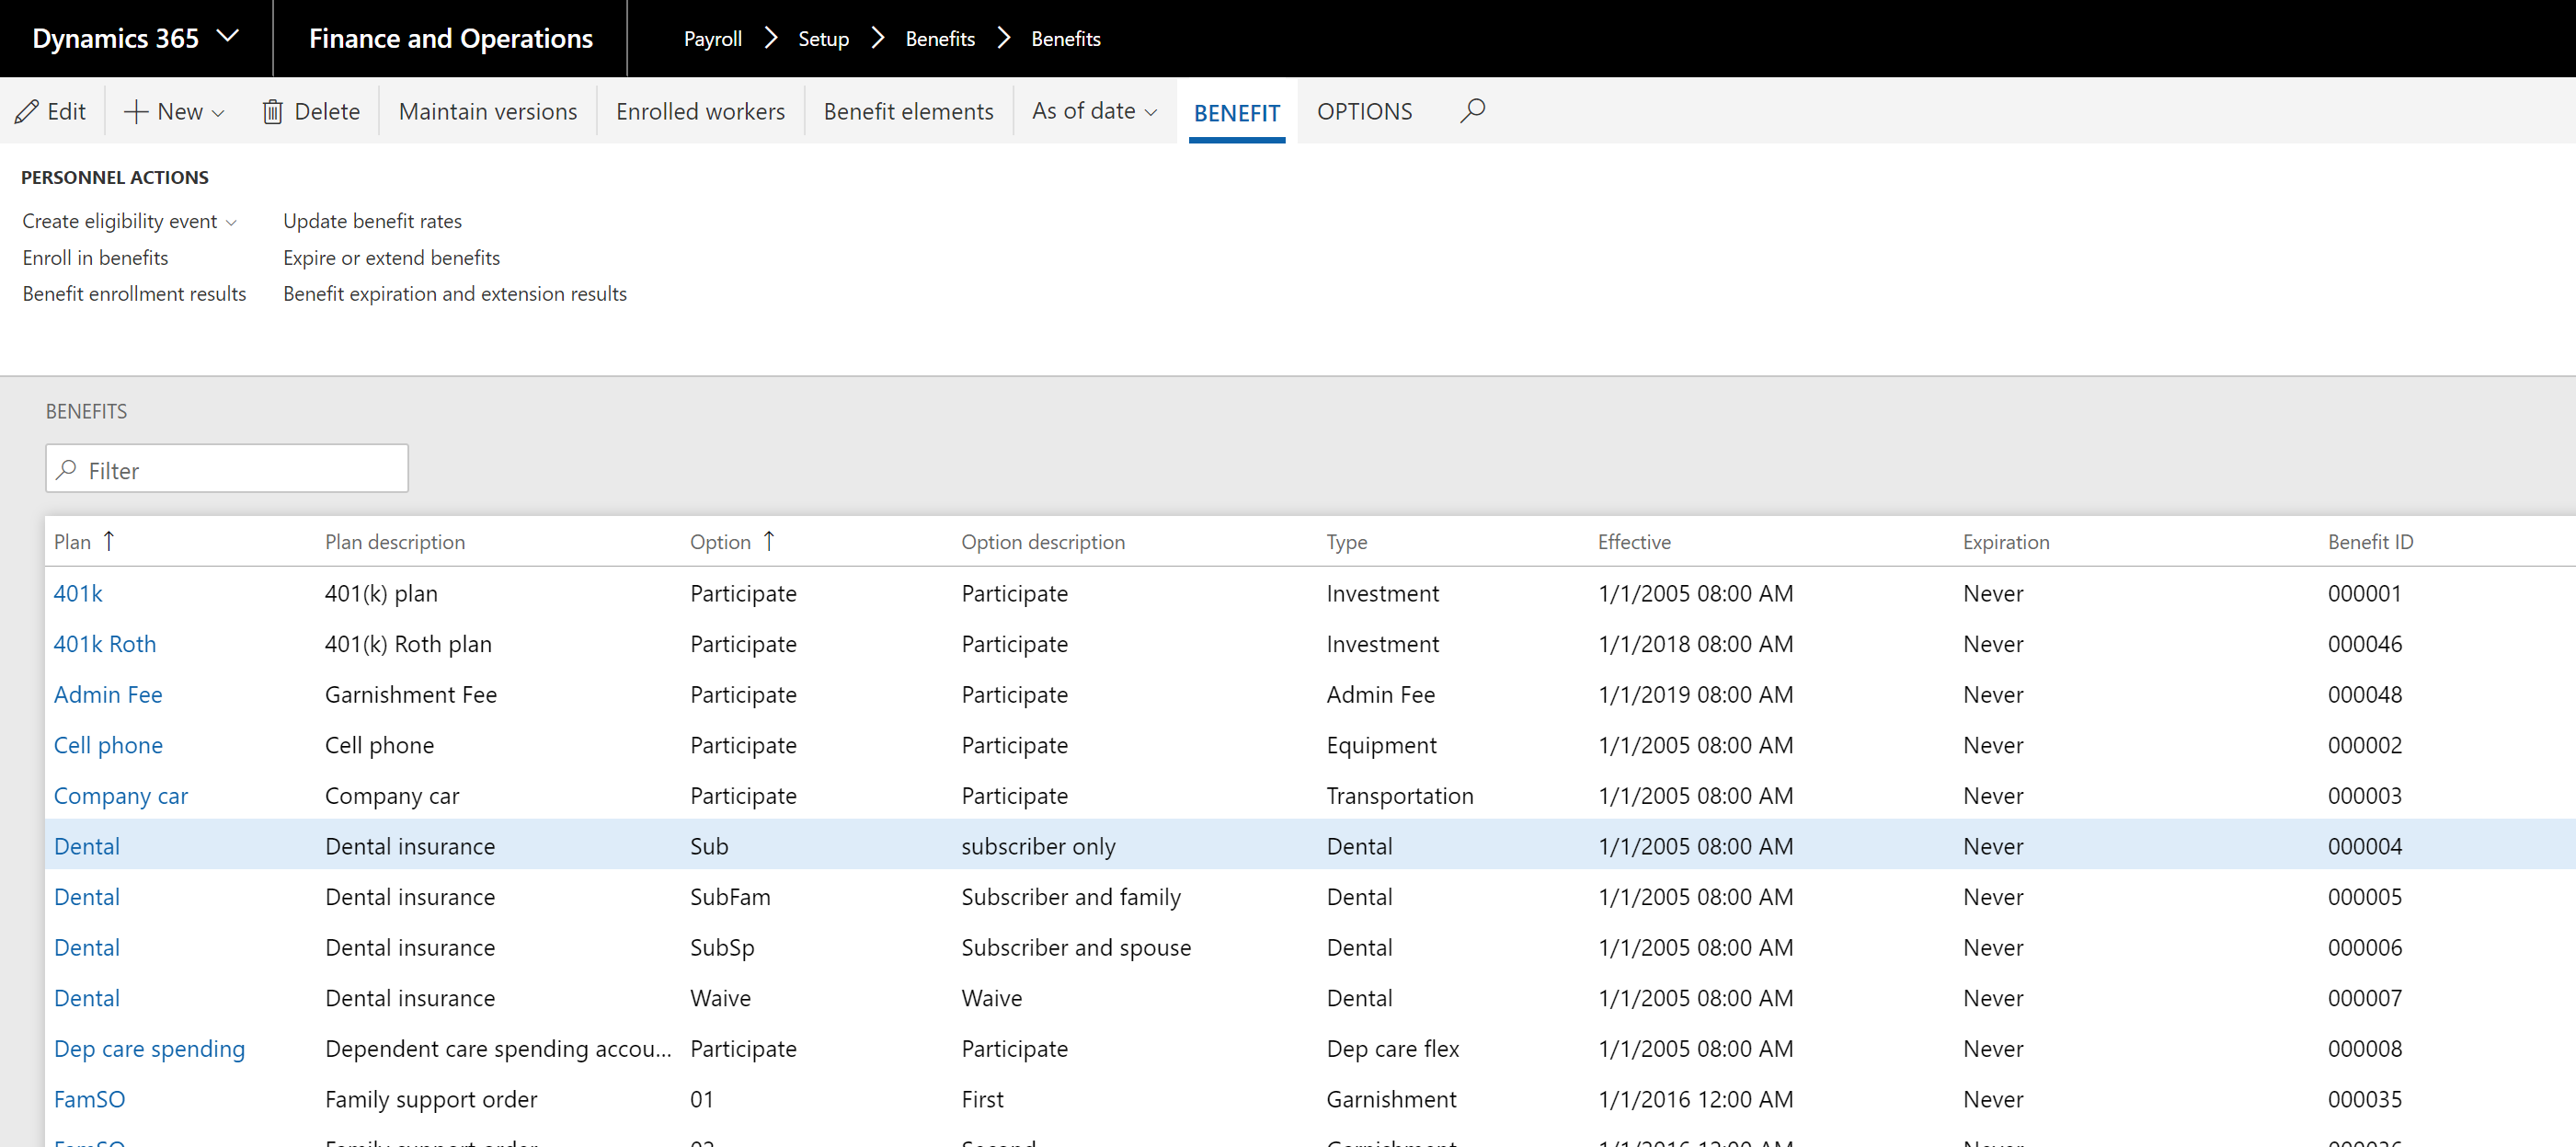
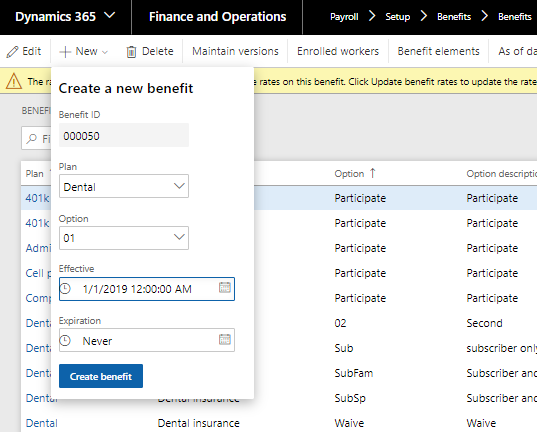
When you create a new benefit, a pop up appears asking for the benefit element plan and option. Here is where you will build multiple benefit and option combinations – such as Healthcare plus your four options. So, there will be 4 benefits created with different options for employees to choose. Next you complete the effective (start) date and the expiration date. The expiration date can be never since you can have multiple versions of this benefit to cover changes in cost each year – more information on this topic can be found in the article Maintaining Benefits.
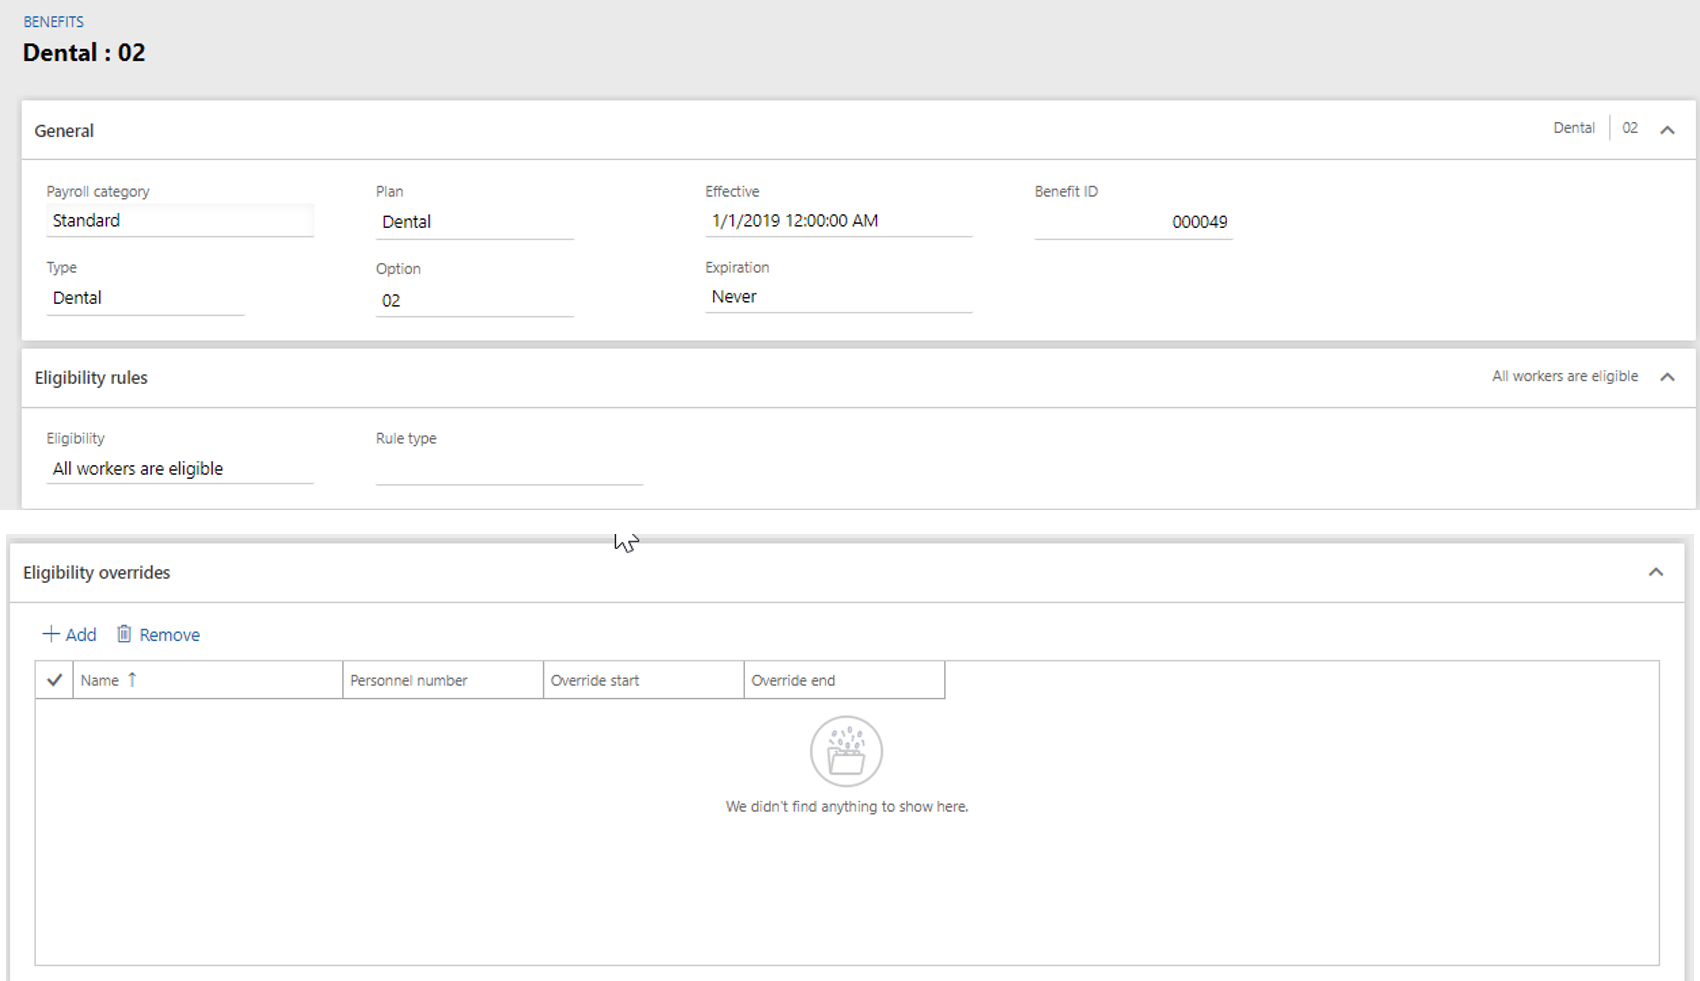
Next, open the benefit to see the details – eligibility, payroll details, earning basis. The first section are the details you filled out when you created the new benefit. The second section determines the eligibility rules which include – all workers are eligible, rule based, and bypass eligibility process. If the benefit is only given based on certain criteria, then the eligibility rule can be created in Human Resources > Benefits > Eligibility > Eligibility Rules. The third section allows you to override the eligibility by adding workers and giving them a time limit to update the details of their benefit.
The last two sections allow you to input the details related to payroll and earnings. The payroll details include the which pay statement will be affected by the benefit. If your company pays their employees weekly, but a benefit should only be deducted on the first check of the month, then you would select the frequency that correlates with that pay. If it is deducted every pay period, then you could select All. The basis of deduction or contribution has 8 options, the most commonly used are percent of earnings (401k/retirement plans) and Fixed amount. The amount or rate is what is withheld as a dollar or percentage of the earning basis. This can also be updated in the Maintain Versions portion of the tool bar and is discussed in the Maintain Benefits article.
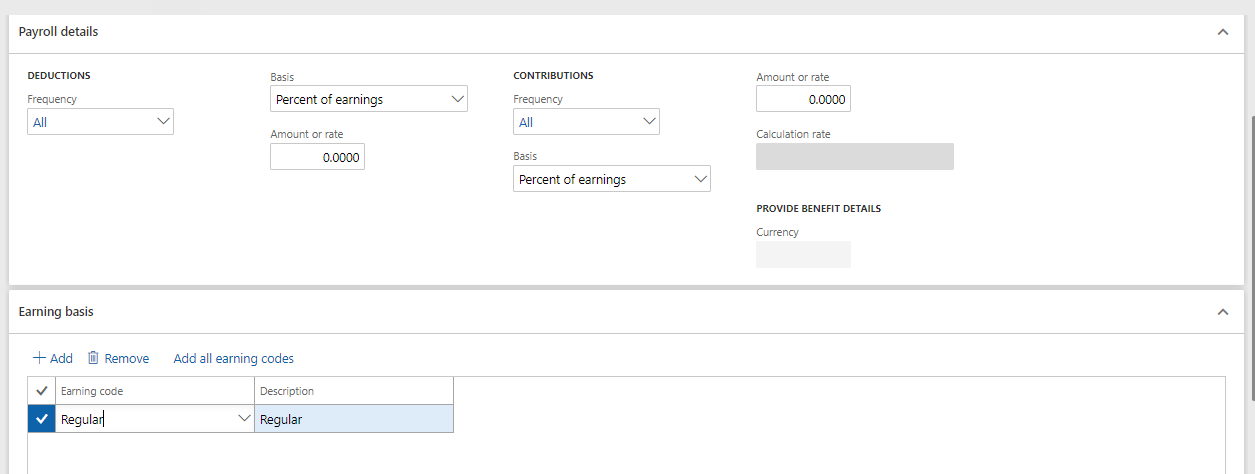
The earning basis section is important if the benefit is calculated from the earnings statement. For example: your 401k is based on a percentage of your earnings. This is where you would input all the earning codes that should be included in that calculation. It is not always “all” the earning codes as employees may not have 401k from their bonus or expense reimbursements. If the benefit is on most of your earning codes, use the add all earning codes button and just remove the ones you are not using for the calculation.
The benefit is now ready to be assigned to employees and used on future payroll statements.
Please contact SIS @ 678-380-2267 or email info@sisn.com for any information and questions you may have.
We previously blogged other helpful Dynamics 365 FO Finance Tips & Tricks in the series:
Part 1 – Finance Tips & Tricks for General Ledger
Part 2 – Tips & Tricks for Fixed Assets – Asset Location & Lending
Part 4 – Payroll Tips & Tricks for Benefits – Maintaining Benefits
Please be on the lookout for the next post in this series.